|
Building 64-Bit AMD64
Applications With Visual Studio
Many developers building 64-bit
Windows applications will be using Microsoft's well-regarded
integrated development environment, Visual Studio. Alan Zeichick
discusses how to configure Visual Studio 6 and Visual Studio
.NET 2003 to support the AMD64 architecture.
|
It's a powerful combination: 64-bit Windows, the AMD64 architecture and Microsoft's Visual Studio. The forthcoming release of 64-bit Windows will provide millions of developers with an easy path to building more scalable server and advanced desktop applications using the familiar Windows development model and APIs. The 64-bit extensions of the x86 architecture, developed by AMD, provide a 64-bit Windows platform that can also run 32-bit apps at full speed, without sacrifices. And Visual Studio is the top multi-language IDE for Windows developers building both managed and unmanaged code.
Many of the pieces in that above combination are still under development, of course. AMD's part is ready: the AMD64 architecture has been shipping for more than a year, and today AMD Opteron and Athlon 64 processors can be found in many leading server and desktop systems.
On the Windows side, Microsoft is offering betas of both Windows XP 64-Bit Edition for 64-Bit Extended Systems and Windows Server 2003 for 64-bit Extended Systems.
For tools, Microsoft is shipping two versions of its IDE: Visual Studio 6, the older release that only generates non-managed Windows code, and Visual Studio .NET 2003, which can build both non-managed native Windows apps and managed .NET applications .
Both versions of Visual Studio can be used to build 64-bit applications that can run on servers and desktops using the AMD Opteron and Althon 64 processors, though in some cases, this may require some tweaking.
|
Visual Studio 6, Service Pack
6 This Service Pack is cumulative, so it replaces all previous Service Packs. There aren't any specific changes in VS6SP6 that affect support for 64-bit Windows, but it's still a good idea to be on the latest release of the IDE and toolchain. |
Installing the Platform SDK
Be sure to check that you have installed the latest version of the
Microsoft Platform SDK for Windows. The Platform SDK includes the
compilers and libraries needed to develop AMD64 applications using
Visual Studio 6 and Visual Studio .NET. MSDN subscribers can find the
Platform SDK in their regular monthly code distribution. You can also download
it from here.
(If you're downloading the SDK, be sure to leave enough time—the file size is 253MB. I hope you're not working over a 14.4Kbps modem!)
Visual Studio 6
Out of the box Visual Studio 6 (let's abbreviate it as VS6) wants to
load its own Win32 32-bit toolchain. You can easily configure
command-line options to launch it using the proper AMD64 64-bit
toolchain, using the /USEENV option to select a specific user
environment that's been predefined using a batch file that's came with
the Microsoft Windows platform SDK. That batch file sets PATH, INCLUDE
and LIB environment variables to point to the correct compilers,
libraries and so-on.
To tell VS6 to load up the 64-bit toolchain, execute the statements
call "C:\Program Files\SDK\SetEnv.Bat"
/AMD64 /RETAIL
start "" "C:\Program Files\Microsoft Visual
Studio\Common\MSDev98\Bin\MSDEV.EXE" /useenv
To resume working with the 32-bit toolchain, quit VS6 and then use the following statements to relaunch the IDE:
call "C:\Program Files\Microsoft
Visual Studio\VC98\Bin\VCVARS32.BAT"
start "" "C:\Program Files\Microsoft Visual
Studio\Common\MSDev98\Bin\MSDEV.EXE" /useenv
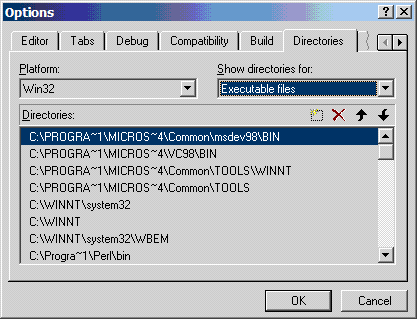 Figure 1: Click to enlarge. |
Once you've launched VS6 with the proper environment, you'll need to build the right type of release and debug project configurations for the AMD64 platform. Here are the steps:
Step 1: Select the Build menu, select Configurations, then click Add.
Step 2: In the "Configuration" text field, add a name, for example "Release AMD64" or "Debug AMD64," and choose from the list "Copy settings from" the corresponding configuration for the Win32 platform, such as "Win32 Release" and "Win32 Debug."
Step 3: Repeat step 2 for the debug configuration and any other configuration in the project, so that for each Win32 configuration there is a corresponding one for the AMD64 platform. Figure 2 shows what the configurations will look like.
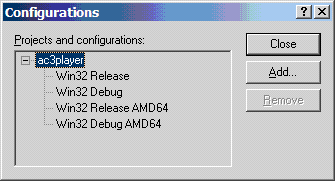 Figure 2: Click to enlarge. |
You may also need to set other options for the AMD64 project. For each sub-project, select the Project menu, then select the Setting option:
- In all AMD64 configurations, under the General tab, change the output directories in order to avoid confusing the environment by mixing AMD64 and Win32 object files.
- In all AMD64 configurations, under the Link tab, append /machine:AMD64 to the options list. VS6 won't let you remove the /machine:I386 option, but as long as /machine:AMD64 comes after it, everything is fine.
- In all AMD64 configurations, under the C/C++ tab, in the General category, make sure that if any debug info is enabled, it is not "Program Database for Edit and Continue."
- In the AMD64 debug configuration, under the C/C++ tab, add /Wp64 to the options list to help to make the source code 64-bit compliant.
|
Debugging 64-Bit Apps In early March 2004, Microsoft began offering a public beta of a new version of Windbg that works with native 64-bit apps under 64-bit Windows. Download that beta. |
Visual Studio .NET 2003
The process for configuring VS.NET 2003 to work with the 64-bit Windows
toolchain is conceptually similar to that for reconfiguring Visual
Studio 6, though some of the screens are different.
Just as with the previous release, VS.NET 2003 picks up its default toolchain through environment variables defined at startup if you use the /USEENV option. You can use the same two-line procedures above to launch it—of course, change the line that invokes VS.NET 2003 to point to the directory where you actually installed the IDE. After you've launched VS.NET 2003, look in the Tools, Options menu and select branch Projects, VC++ Directories to see what the environment looks like, as shown in Figure 3.
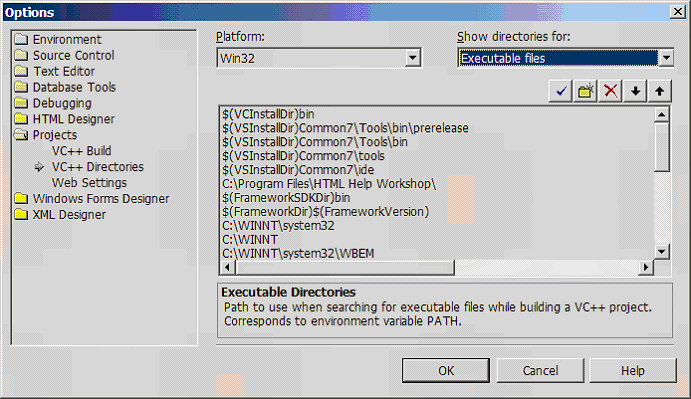 Figure 3: Click to enlarge. |
Once you've loaded the right environment, you'll need to create project configurations for the AMD64 applications. It's straightforward: Select Build, Configuration Manager and then tell it to add a new active solution configuration. Type the name of the configuration, such as "Release AMD64" or "Debug AMD64," and choose the appropriate release or debug options from the "copy setting from" field. Uncheck the "Also create new project configuration(s)" box. Figure 4 shows what this dialog looks like.
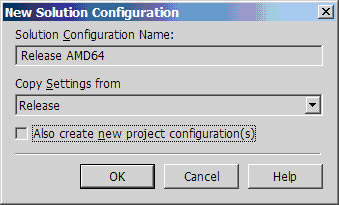 Figure 4: Click to enlarge. |
Before working on your project, you'll have to go through four brief operations, similar to those described earlier for VS6, to ensure that the configuration will work with the 64-bit toolchain.
- In all AMD64 configurations, under the General branch, change the output directories in order to avoid mixing AMD64 and Win32 object files.
- In all AMD64 configurations, under the Linker, Command Line branch, remove all options and replace them with /machine:AMD64.
- In all AMD64 configurations, under the C/C++, General branch, make sure that if "Debug Information Format" is enabled, it is not "Program Database for Edit and Continue."
- In the AMD64 debug configuration, under the C/C++, General branch, add the option /Wp64 to make the source code 64-bit compliant.
Alan would like to thank Evandro Menezes, who works at AMD's Software Research and Development's Tools Team, for his assistance.